lab01 : Crunching numbers: Loops and functions
| num | ready? | description | assigned | due |
|---|---|---|---|---|
| lab01 | true | Crunching numbers: Loops and functions | Fri 01/10 09:00AM | Tue 01/21 11:59PM |
Warning: The Autograder Is Picky
You might get the error: No such file or directory: ./blah in this and future labs. It doesn’t seem like it, but this error means that something didn’t compile. This section explains why.
Even if you only want partial credit for this lab, you have to submit every single file that the lab asks you to turn in. That means, every time you use the autograder for this lab, you have to submit min4.cpp, pi.cpp, and block.cpp or you will get a score of 0. The files don’t have to be correct—they only have to exist and compile. For example, if you only worked on min4.cpp and want partial credit for it, you should create files called pi.cpp and block.cpp with only a simple main function inside them. That way, pi.cpp and block.cpp will compile (and fail all their tests), but the autograder will be able to run the min4 tests and give you credit for those.
The reason this happens is because the autograder needs to compile all the programs before it can start running its tests.
Goals for this lab
In this lab you will get practice
- working in pairs
- learn to use github’s web interface
- for loops and while loops
- calculating a series using for loops and if-else statements
- working with other data types (doubles)
- nested loops
- functions
Working in Pairs
Pair programming is encouraged, but not required.
You are not expected to finish the entire lab in one sitting. Please don’t rush through it and read all instructions carefully. We encourage you to work in pairs for this lab.
Please sit with your pair partner on the same terminal. Decide who will be the ‘driver’ and who will be the ‘navigator’. Choose who will be the driver for the first part of the lab. The driver should sit down in front of the computer now. The navigator gets a chair and sits next to the driver. You should exchange roles after awhile, before the driver gets tired, and before the navigator gets bored or distracted. See the following video on pair programming to work well with your partner:
http://bit.ly/pair-programming-video
-
If you have questions about pair programming, ask your TA.
-
If you face difficulties with pair programming consult your TA.
Academic Honesty (this lab may be completed with a pair partner)
All work submitted for this lab should be your own and your pair partner’s (if you have a partner). Do not use code posted on the internet. If you are using any hints from a previous offering of this course that was posted publicly by a CS16 instructor, you must cite your source.
C++ Style guide
Please follow the information in this C++ style guide: https://docs.google.com/presentation/d/16ExuzjlRWClQe-GbX_FNYKsSJnrd0Z5ef7N1c0sezUA/edit?usp=sharing
Log on and create a local directory
- Log into the driver’s CoE account on CSIL and open a terminal.
- Under your cs16 directory, driver create a new directory named lab01 (refer to lab00 for instructions if you have forgotten how to do this)
You are now ready to get the starter code.
Getting the starter code
Copy the code from the instructor’s account on the CSIL server into your local lab01 directory by issuing the following command:
-bash-4.2$ cp /cs/faculty/dimirza/cs16/labs/lab01/* ~/cs16/lab01/
After doing this command, if you cd into ~/cs16/lab01/ and use the ls command, you should see three .cpp files and a README:
-bash-4.2$ ls
min2.cpp  min3v1.cpp  min3v2.cpp README.md
-bash-4.2$
If you don’t see those files, work with your pair partner to go back through the instructions and make sure you didn’t miss a step. If you still have trouble, ask your TA for assistance.
Create a repo on github in our class organization
For this lab and all subsequent programming assignments, you should start by creating a repo in the ucsb-cs16-mirza organization. Follow these steps
- Navigate to your dashboard on https://github.com/. From the left drop down menu, select the class organization
-
Click on the green “New repository” button to create a new repository.
-
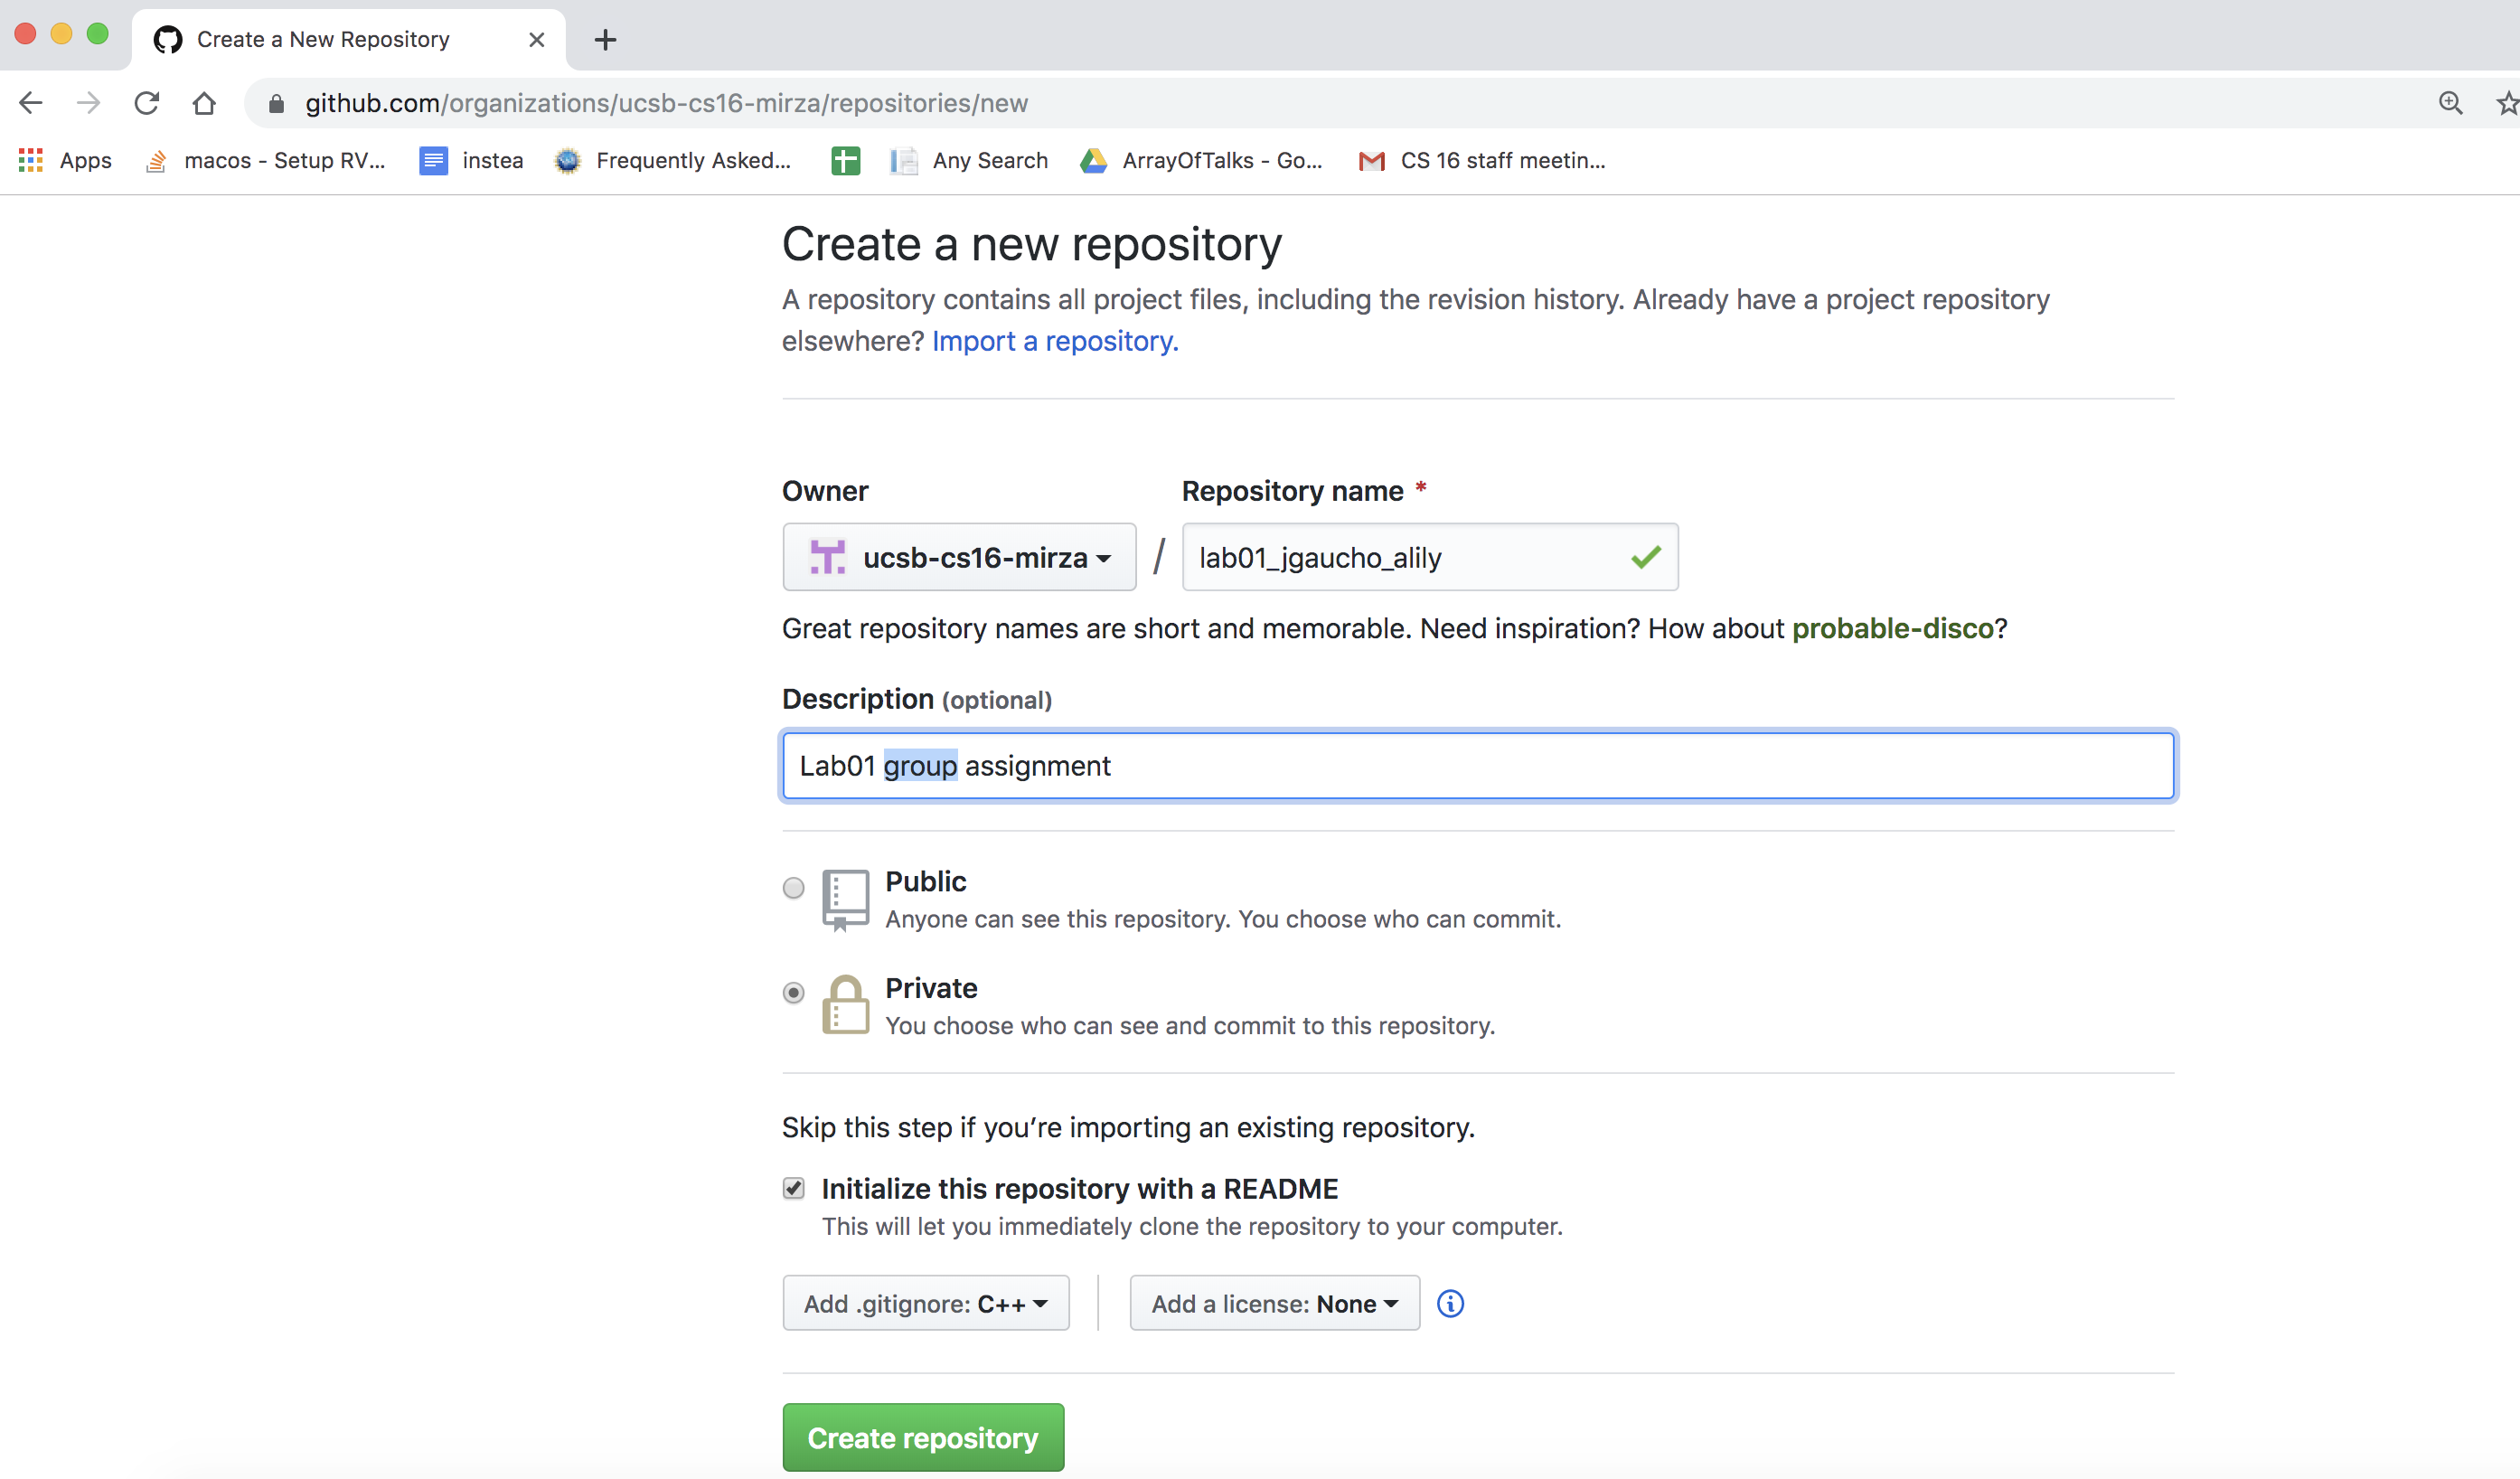
Type the name of your repo following the naming convention lab01_your-github-username. For example if your github username is jgaucho, you should name your repo as lab01_jgaucho. If you are working with a partner, include your partner’s github username in the name of the repo. e.g. lab01_jgaucho_alily
-
Select the “Private” visibility option so that other students in the org cannot view your code.
- Add the C++ .ignore option from the drop down menu and click on “Create repository”. See screenshot below.
-
Click on the “Create repo button”
-
Click on the “Settings” tab, then click on the “Collaborators and teams”. Search for your partner’s github username under collaborators and add them. Log out of github.
-
Navigator, log into github and accept the invitation.
-
You now have shared ownership of all the code that you will write for this lab.
Upload the initial version of your code using github’s web interface
-
Upload the files in your lab01 directory to the new repo you created in the previous step. To do this, you should be physically present on a lab machine or in CSIL where you have access to a web browser and a local copy of your files (min2.cpp min3v1.cpp min3v2.cpp README.md). On your web browser, navigate to your repo on github. Click on the “Upload files” button.
-
Now either drag and drop the files: from your machine or use the “Choose your files” option to browse through your local directory and upload the file. Then press the green “Commit new files” button. Navigate back to your repo to see that the files you uploaded are correctly listed. Click on it and you should see your code on github’s web interface.
Solving the problems for this lab
If you are in a pair, make sure you switch the driver and navigator roles at this point. You must switch roles twice more before the end of the lab. This assignment consists of 3 problems, each of which is described below. The first one is worth 20 points each, and the last two are worth 40 points each. Each should be solved in its own file and all three must be submitted for full assignment credit. These exercises are inspired by the ones from the textbook (in Ch. 2 and Ch. 3) - but they are NOT the same, so follow the instructions on THIS sheet carefully.
You will need to create three files named block.cpp, min4.cpp, and pi.cpp: Each corresponds to one of the problems listed below, which make up this lab.
For a reminder on how to open and use a text editor to create and edit new source files, refer back to Lab #0.
For all the subproblems given in this assignment you must compile your code frequently (as you develop it), and test it extensively with as many inputs as you can think of.
Print a block
- Navigate to your lab01 directory using the cd command
- open a file called
block.cppusing the same editor you used for the previous labs. - In that file, write a program that takes an input from a user for the number of rows and number of columns and prints out a block of characters that is based on these 2 parameters. The program should keep asking the user for input, and printing out the result, until the user enters zero for either of the input parameters.
A session should look exactly like the following example (including whitespace and formatting - note that there is no whitespace at the end of each of these lines), for all the different inputs and the output:
$ ./block
Enter number of rows and columns:
1 5
X.X.X.X.X.
Enter number of rows and columns:
2 2
X.X.
X.X.
Enter number of rows and columns:
2 5
X.X.X.X.X.
X.X.X.X.X.
Enter number of rows and columns:
10 5
X.X.X.X.X.
X.X.X.X.X.
X.X.X.X.X.
X.X.X.X.X.
X.X.X.X.X.
X.X.X.X.X.
X.X.X.X.X.
X.X.X.X.X.
X.X.X.X.X.
X.X.X.X.X.
Enter number of rows and columns:
0 1
Each string printed by the program should include a newline at the end, but no other trailing whitespace (i.e. extra space characters at the end of the line).
For this problem you have to use a for-loop and a while or do-while loop. While loops are similar in that the code inside the body of the while is repeated as long as the while condition is true. Here is the syntax for while
while('expression'){
	//Repeat these statements
}
‘expression’ should be replaced by the appropriate boolean expression. The body of the loop is executed as long as the expression is true. e.g.
int x=5;
while(x>0){
    cout <<x<<" ";
	x--;
}
The above code prints 5 4 3 2 1.
To compile your code use the g++ command as in lab01 OR the simple make command as in lab01
$ g++ -std=c++11 -o block block.cpp
OR
make block
If you used the first option (g++ …) note that the -std=c++11 option in these commands is optional to use (that is, not critical to define). All this does is force the compiler to use the latest version of C++.
If you used the second option (make…) note that the make program is clever to compile only block.cpp into the block executable, even though there are other programs (cpp files) in that directory. Note that the C++11 compiler will not be used in the default make tool. But that should be okay for now.
If you encounter an error, use the compiler hints and examine the line in question. If the compiler messsage is not sufficient to identify the error, you can search online to see when the error occurs in general.
Run your executable as follows to test it out.
$ ./block
Remember to re-compile the relevant files after you make any changes to the C++ code.
Upload your files to your repo on github using github’s web interface following the instructions at the beginning of this lab.
Calculate the approximate value of PI
Switch roles with your partner.
Write a C++ program in a file named pi.cpp that approximates the value of the constant π. Once again you should not resort to using predefind constants and functions for π, that are provided by C++ standard libraries. Instead you should compute the value of π based on the Leibniz formula for π. The formula is given below:
1 – 1/3 + 1/5 – 1/7 + 1/9 ... = pi/4
Put another way, the formula can be written as:
pi = 4 · [ 1 – 1/3 + 1/5 – 1/7 + 1/9 ... + (–1 ^ n)/(2n + 1) ]
The Leibniz formula works well for high values of n.
The program takes an input from the user for the value of n, which determines the number of terms in the approximation of the value of pi. The program then outputs the approximated value of pi as calculated by the Leibniz formula. You must also include a loop that allows the user to repeat this calculation for new values of ‘n’ until the user says she or he wants to end the program by issuing an input of -1 (or any other negative number). You may assume that the user always inputs an integer.
The program should print a string of text to the terminal before getting each piece of input from the user. A session should look like the following example (including whitespace and formatting), showing the expected output for different inputs:
Enter the value of the parameter 'n' in the Leibniz formula (or -1 to quit):
0
The approximate value of pi using 1 term is: 4.000
Enter the value of the parameter 'n' in the Leibniz formula (or -1 to quit):
3
The approximate value of pi using 4 terms is: 2.895
Enter the value of the parameter 'n' in the Leibniz formula (or -1 to quit):
9
The approximate value of pi using 10 terms is: 3.042
Enter the value of the parameter 'n' in the Leibniz formula (or -1 to quit):
49
The approximate value of pi using 50 terms is: 3.122
Enter the value of the parameter 'n' in the Leibniz formula (or -1 to quit):
99
The approximate value of pi using 100 terms is: 3.132
Enter the value of the parameter 'n' in the Leibniz formula (or -1 to quit):
999
The approximate value of pi using 1000 terms is: 3.141
Enter the value of the parameter 'n' in the Leibniz formula (or -1 to quit):
9999
The approximate value of pi using 10000 terms is: 3.141
Enter the value of the parameter 'n' in the Leibniz formula (or -1 to quit):
-1
Be sure to have a newline after each “Enter the value…” prompt and no other white spaces.
Here is a link that gives the approximated values of pi for up to 1000 terms: http://www.eveandersson.com/pi/gregory-leibniz
In addition, all approximated floating pointer numbers must be displayed to exactly three digits after the decimal point. To do this you should use set the precision for displaying floating point numbers before any of the cout statements in your code. This is done as follows:
cout.setf(ios::fixed); 	   // Display in fixed point notation. For example, display 1e-1 as 0.1
cout.setf(ios::showpoint); // Always display the decimal point.
cout.precision(3);         // Set the number of digits to display after the decimal point to 3
To calculate x to the power of y, use the pow(x,y) function from the standard library. To do this you will need to include the header file: cmath
Upload your files to your repo on github using github’s web interface. (You will need to be on a csil machine and not remotely logged in to do this step (because you need to use a web browser with access to those files). Disregard this if you’re working on your own machine.)
Calculate the minimum of 4 numbers
Switch roles with your partner.
In this part of the lab you will write a program that compares 4 input numbers and prints out the smallest one.
You should not use the min() function in C++ algorithm library or any other outside function that performs the minimum operation for you. Instead, you should base the program on the example programs provided to you that compare fewer inputs.
Start by examining the given examples, also described below:
min2.cpp
This program takes two command line arguments, and converts them to integers. It then calls a function, smallest_of_two, that returns the smallest of the two numbers (or the value they share in case of a tie.) It then prints out the result of that function call.
min3v1.cpp
This is the first of two versions of a program that takes min2.cpp one step further, finding the smallest value from among three numbers. Again, if there is a tie, it prints the tie value. Look at the nested if/else statements and see if you can make sense of the logic. Seek help if you don’t.
min3v2.cpp
This program does EXACTLY the same thing as min3v1.cpp, but does it with much cleaner, simpler code. Notice how we REUSE the smallest_of_two function to build up a smallest_of_three function.
Your job in this step is to test min2, min3v1 and min3v2 with many different values and convince yourself that they work properly.
In the next step, you will be taking these programs to the next logical step in this sequence.
Your main task: Write min4.cpp
-
Write a program that works just like min2 and min3v1 and min3v2, except it takes four ints on the command line, and prints the smallest value, handling ties appropriately.
-
We encourage you to follow the model of min3v2.cpp if you can understand how this works, since your code will be far cleaner than trying to build this out of nested if/else statements.
If you DO use nested if/else statements, though, be sure that you indent and format your code appropriately.
Follow the pattern in min2 and min3v1/min3v2 in terms of all other issues and how they are handled, including the usage message, etc. Your program should look exactly like these except that it works on 4 inputs (note, there are no trailing whitespacse):
./min4
Usage: ./min4 num1 num2 num3 num4
 Prints smallest of the four numbers
Here is the output of the program with the correct number of inputs:
$ ./min4 3 4 5 6
3
Here are two more example runs:
$ ./min4 92 35 12 17
12

$ ./min4 92 -35 12 17
-35
To compile your code use the g++ command as before.
$ g++ -std=c++11 -o min4 min4.cpp
Run your executable with different inputs to test it out.
Upload your files to your repo on github using github’s web interface.
Submit your code on gradescope
Once you are satisfied that your program is correct, then it’s time to submit it.
Log into your account on https://www.gradescope.com/ and navigate to our course site. Select this assignment. Then click on the “Submit” button on the bottom right corner to make a submission. You will be given the option of uploading files from your local machine or submitting the code that is in a github repo. Select the second option and select your github repo for this assignment. You should receive 100/100 for a completely correct program.
If you are working with a partner, make sure you have correctly added your partner to gradescope. You should also have both your names on every file that you submit. You and your partner should make only one group submission on gradescope and should not submit your work indivisually.
Done!
You are now done with this assignment! If you are in the Phelps lab or in CSIL, make sure to log out of the machine before you leave. Also, make sure to close all open programs before you log out. Some programs will not work next time if they are not closed. Remember to save all your open files before you close your text editor.
If you are logged in remotely, you can log out using the exit command:
$ exit
Code style
We ask that you practice, good coding style which includes but is not limited to the following:
- Code can be easily understood by humans familiar with C++ (including both the author(s) of the code, and non-authors of the code.)
- Code is neatly indented and formatted, following standard code indentation practices for C++ as illustrated in either the textbook, or example code given in lectures and labs
- Variable names choices are reasonable
- Code is reasonably “DRY” (as in “don’t repeat yourself”)—where appropriate, common code is factored out into functions
- Code is not unnecessarily or unreasonably complex when a simpler solution is available
In completing this lab you must also demonstrate an understanding of the following:
- for-loops and if-else structure