lab00 : Getting started
| num | ready? | description | assigned | due |
|---|---|---|---|---|
| lab00 | true | Getting started | Tue 01/15 09:00AM | Tue 01/22 09:00AM |
Introduction
This lab is an introduction to programming on CSIL and the tools you’ll need for this course. The intended outcome is:
- Learn about the tools you will be using in this class (Gradescope and github).
- Create the necessary accounts.
This lab must be completed INDIVIDUALLY. In the subsequent labs you are encouraged to work with your programming partner.
Tell us about yourself
Please fill out the following form to tell us about yourself: https://goo.gl/forms/ouvjRmS2Gmcr0g6a2. We will use the information to pair you with your preferred programming partner or someone in the class with the similar skill levels as yourself.
Setup the tools for this course
As you are working through the lab, we recommend reading the entire section with all of its steps before trying it out yourself. Doing so will help you see the bigger picture of how the steps fit together.
Create a CoE account
We encourage you to complete all programming assignments by logging in to the machines in the Computer Science labs, or to connect remotely. To do this you will need a College of Engineering account. If you don’t have one already, you can create an account online at https://accounts.engr.ucsb.edu/create.
If you are enrolled in any CoE course this quarter (including CS16), you can create your account immediately. Otherwise, you need to contact the ECI Help Desk at help@engineering.ucsb.edu.
Setup GitHub and add yourself to our organization
We have created an organization called ucsb-cs16-w19 on github.com where you can create private repositories (repos) for your assignments in this course. The advantage of creating private repos under this organization is that the course staff (your instructors and TAs) will be able to see your code and provide you with help, without you having to do anything special.
To join this organization, you need to do three things.
-
If you don’t already have a github.com account, create one on the “free” plan. Visit https://github.com/ and use your @ucsb.edu address to create an account.
-
If you don’t already have your @ucsb.edu email address associated with your github.com account, go to “Settings”, add that email, and confirm that email address (using the confirmation link that was sent to the email address you initially provided).
-
Visit our Github Sign Up Tool at https://ucsb-cs-github-linker.herokuapp.com/, login with your github.com account, click “Home”, find this course (CS16-W19), and click the “Join course button”. Doing so will automatically send you an invitation to join the course organization on github (see next step).
-
You can go straight to https://github.com/ucsb-cs16-w19 and see the invitation there (if you’re logged in). Accept the invitation that appears in your browser (from step 3) or log into your account on https://github.com/ to accept the invitation.
Setup Gradescope
We will use Gradescope to grade all your quizzes, homeworks, exams, and lab/programming assignments. I have manually added everyone (using your @ucsb.edu accounts) who is currently enrolled in the course to the Gradescope system. You should have received an email notification with instructions about logging into Gradescope. Once you follow the instructions to set your password, you should have access to our course on Gradescope.
The lab assignment “Lab00” should appear in your Gradescope dashboard for your CS 16 course. You will need to submit your code for Lab00 there.
Implement and submit a simple C++ program
Step 1: Open a Terminal and write a “Hello World” program
The first step in every assignment will be to open a terminal window, which will be the environment you use to write, compile, and run your programs.
-
If you are working on a machine in the Phelps 3525 please see Step 2a for further instructions.
-
If you are working on a machine in the Computer Science Instruction Lab (CSIL), you’ll be working on one of the following machines:
csil-01.cs.ucsb.edu,csil-02.cs.ucsb.edu, etc.(thoughcsil-48.cs.ucsb.edu). Please see Step 2a for further instructions.
If you are working on your laptop, whether Windows, Mac or Linux, the instructions below will tell you how to connect to csil-[01-48].cs.ucsb.edu.
-
If you are working on your laptop and it is a Mac or Linux machine, go to Step 2b.
-
If you are working on your laptop and it is a Windows machine, go to Step 2c.
Step 2: Connecting to CSIL
Step 2a: Opening a Terminal on a Phelps or CSIL Lab Machine
-
Log in to the machine using your CoE account credentials (i.e., your username and password that you created using instructions above).
-
Find the Activities menu, which is in the top-left corner of the screen. Click on it to open the menu.
-
Next, type “shell” in the search box. Then click the “Terminal” application which appears.
-
You should now see a terminal window open. You can open more tabs or windows from the Terminal application’s menu. Skip to Step 3 and read the other Step 2 steps later when you attempt to log in remotely.
Connecting to CSIL Remotely
Step 2b: Connecting to CSIL via SSH on Mac OS X or Linux
To get started on Mac OS X or Linux, you first need to open a terminal program. This involves slightly different steps on either OS.
- On Ubuntu (an example of a Linux OS):*
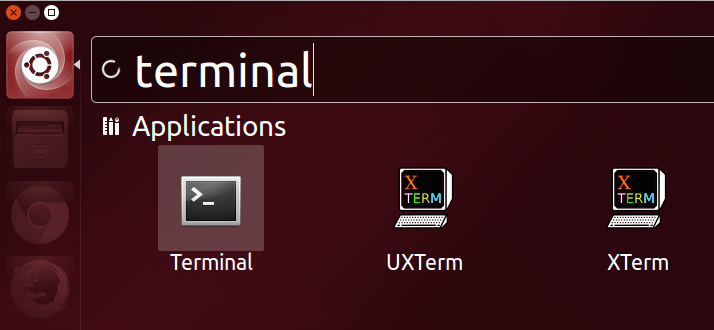
- Find the search menu. It appears at the top of the Unity bar:
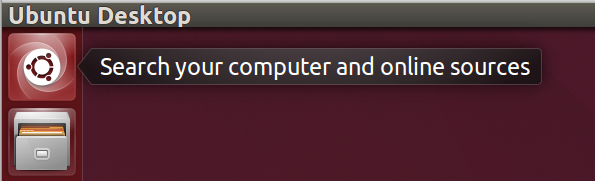
- Click on that icon to open the search menu. Then type “terminal” and click on the “Terminal” application which appears:
On Mac OS X:
- Open the “Terminal” application. It is found inside the Applications folder of your main drive, inside the Utilities subfolder. The icon looks like this:
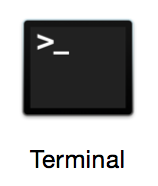
You can also find it using Spotlight by typing “terminal” and pressing ENTER.
Once you have a terminal window open on your machine, you next need to connect to the CSIL server remotely.
You will do this using a UNIX command (an internet protocol, really) called SSH (short for Secure SHell).
Type the following command in your terminal, replacing USERNAME with your CoE username and substituting ## with a number between 01 and 48 (make sure to have a 0 in front, if you are using numbers between 1 and 9). Note: The $ represents the terminal prompt; you won’t type this character. Whenever you see it, that means that the following command is intended to be typed into the terminal window and run by pressing Enter.
$ ssh USERNAME@csil-##.cs.ucsb.edu
SSH will first ask you a question which looks like this:
The authenticity of host 'csil-[01-48].cs.ucsb.edu (128.111.43.14)' can't be established.
RSA key fingerprint is 90:ab:6a:31:0b:81:62:25:9b:11:50:05:18:d3:1a:b5.
Are you sure you want to continue connecting (yes/no)?
Type yes and then ENTER to continue. It will next ask for your CoE account password. When you type it in, nothing will show on the screen (not even dots). However what you type is still being sent and once you are finished with your password, you can press ENTER to login.
You should now be remotely connected to CSIL! You can make sure by typing the following command (which will tell you what machine you are currently issuing commands to):
$ hostname
This should show csil-[01-48].cs.ucsb.edu. You can now do anything you could normally do in a terminal window in CSIL or the Phelps lab (except run graphical programs).
Step 2c: Connecting to CSIL via SSH on Windows with PuTTY
To connect remotely on Windows machines, we recommend using a program called PuTTY. This program is a well-known and widely-used SSH client for the Windows OS.
First, download the program from http://www.chiark.greenend.org.uk/~sgtatham/putty/download.html. You only need the executable file putty.exe, but feel free to download any other programs that you want. The page includes portable versions and a version with an installer. Always make sure to download PuTTY from this site, so that you can make sure it is the correct program.
Once downloaded, run PuTTY like you would open other programs. If you just download the putty.exe file, you can open it from your downloads folder directly. You can also move it to any other location on your machine and open it from there. If you used the installer, open PuTTY from the Start Menu.
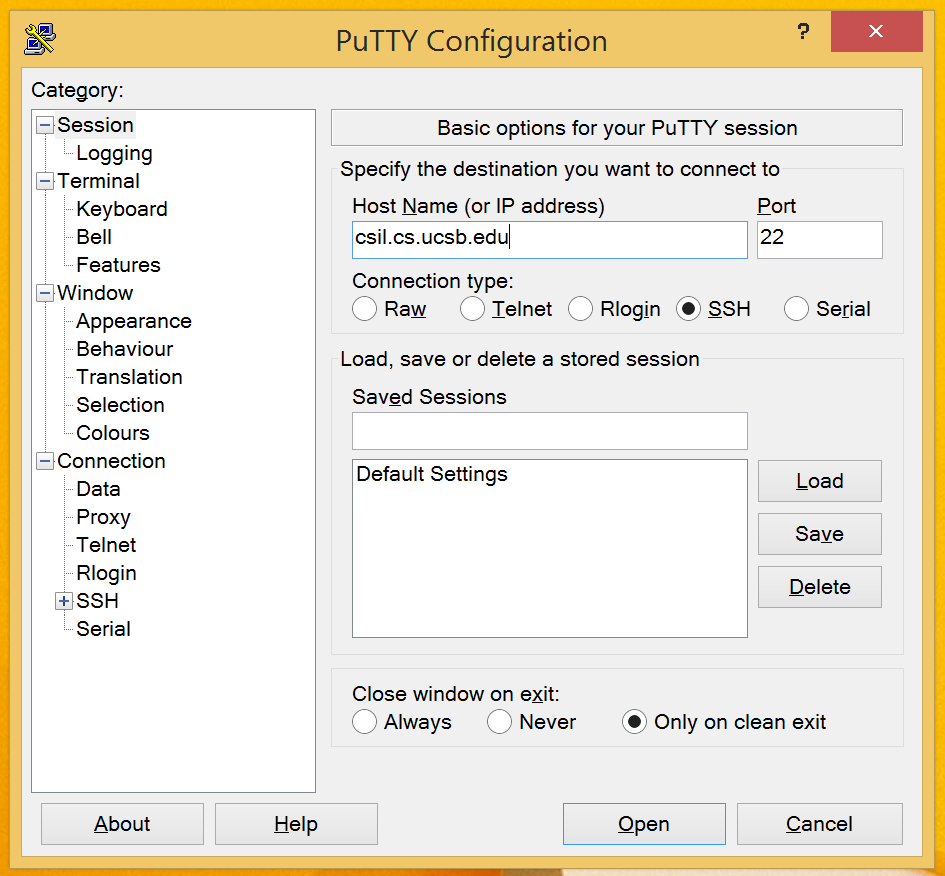
When PuTTY opens, you should see a window that looks like this:
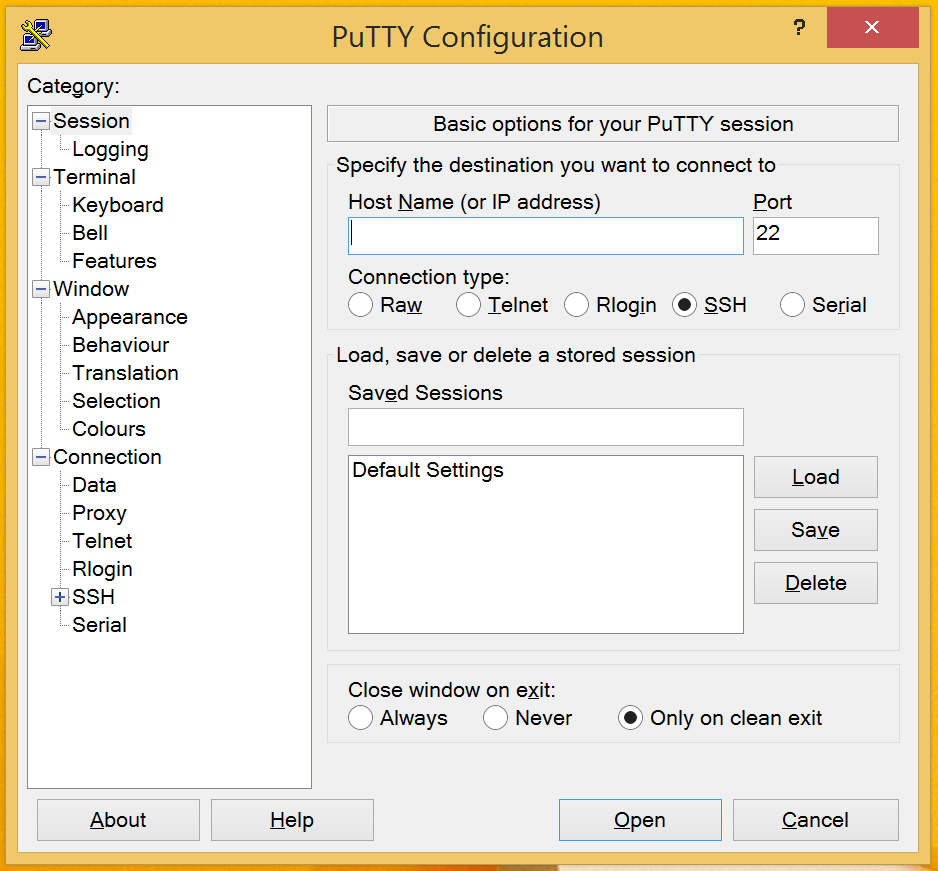
Type csil-[01-48].cs.ucsb.edu into the box labeled “Host Name (or IP address)”. Leave the “Port” setting at 22 and leave the “SSH” button checked. The window should now look like this:
Then click on the “Open” button to connect. PuTTY will then show a prompt which looks like this:
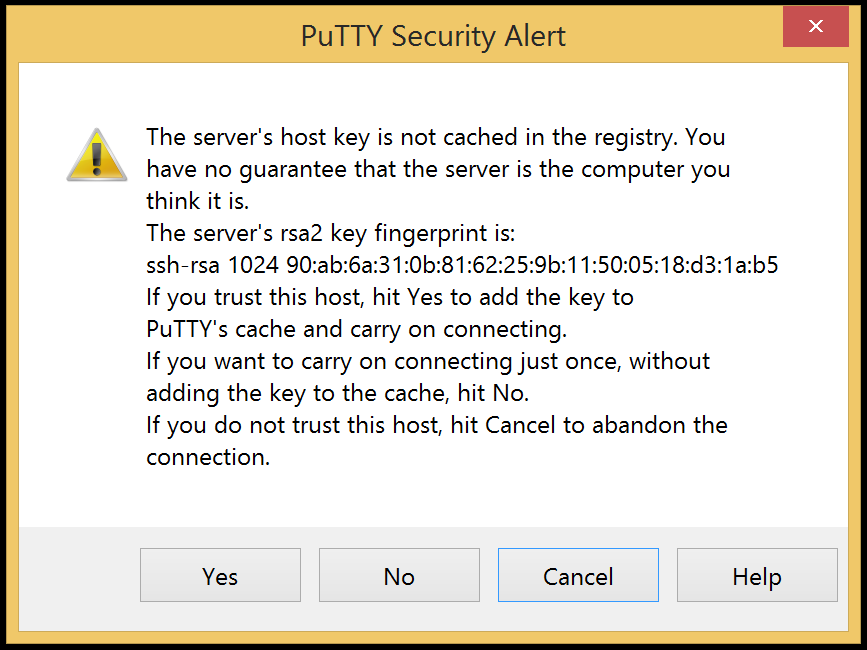
Click “Yes” to accept and have PuTTY remember CSIL’s key.
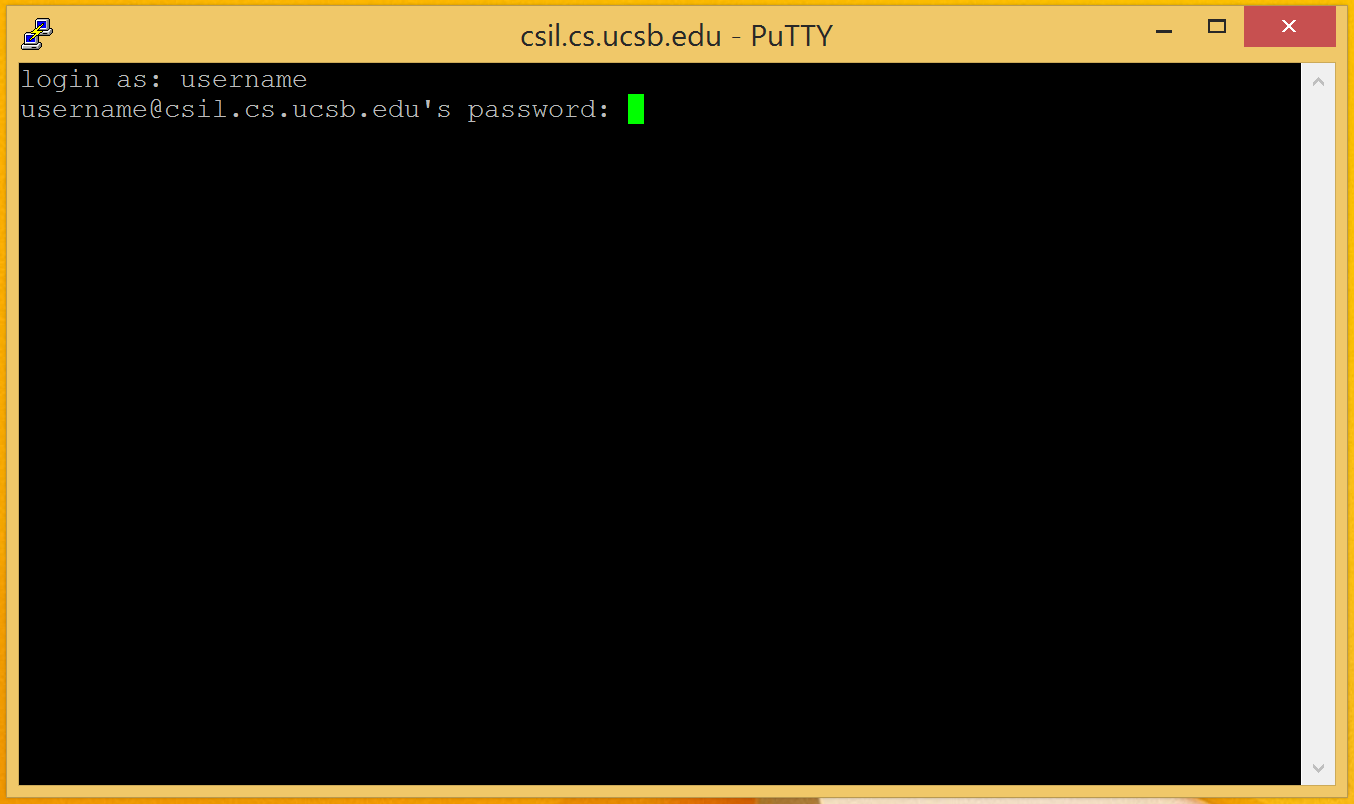
Once a connection is made, CSIL will ask for both your username and then your password. Type in your CSIL username and password. The password will not be shown on the screen, but the characters you type are being used. This step will look something like this (with your username instead of “username”):
Once you have logged in successfully, you should be connected remotely to the CSIL server. Run the following command to make sure (this command shows the full host name of the machine you are logged in to):
$ hostname
This command should output csil-[01-48].cs.ucsb.edu. You can now do anything in this terminal window that you could do on a CSIL machine or a Phelps lab machine, except run graphical applications.
If you want to run graphical applications, instead of using puTTY, you can use other programs, such as MobaXterm.
Step 3: Create cs16 and lab00 directories
Now that your environment is set up, you will need to create a directory (a folder is also called a directory in Linux) that will contain all your work for the course. Then, inside that directory, you will need to create another directory to contain your work for this assignment.
To create your CS16 directory, use the mkdir command. Type the following in the terminal and press Enter:
$ mkdir cs16
The $ represents the terminal prompt; you won’t type this character. Whenever you see it, that means that the following command is intended to be typed into the terminal window and run by pressing Enter.
You can see list of files and directories in the current directory with ls command. Type the following in the terminal and press Enter:
$ ls
You should be able to see the directory you just created i.e., cs16.
Now move into that new CS16 directory with the cd command as follows:
$ cd cs16
Now create and move into a lab00 directory:
$ mkdir lab00
$ cd lab00
Note that you could have alternatively created the entire path by adding the flag -p to the mkdir command (i.e., make -p cs16/lab00).
At any time, you can check what directory you are current in with the command pwd. It will output the full path of the current directory. For example, if you are inside your lab00 directory, you might see:
/cs/student/yourcsilname/cs16/lab00
Knowing how to navigate a UNIX environment and issue UNIX commands is VERY valuable to computer scientists and engineers. To learn more UNIX commands, there are lot of cool Web resources and books on the topic. This is one website with a good introductory page: Useful unix commands.
Step 4: Edit text files
Let’s take a little detour on how to best create and modify text files. These will carry all the code (regardless of computer language) that we want to assemble, compile, and execute.
You are surely all familiar with Microsoft Word as a widely-used “word processor”, but please DO NOT USE MS WORD TO WRITE PROGRAMS!!! :)
Instead, for programming, you have access to a very large number of excellent text editors - most of them are free to use! All software developers have their preferences, but learning the basics of a Unix-based command line text editor is very important. Every student who intends to study computer science should learn a popular Unix-based text editor (vim or emacs), since it is not uncommon that the machine you need to work on does not have a Graphical User Interface (GUI), and you may be forced to use a command-line editor (this is especially true when connecting remotely). The two most popular Unix-based command line editors are vim and emacs.
In fact, AND PLEASE NOTE THIS, no one editor is necessarily “better” than another. It is a matter of your preference. For the first couple labs in this class, we will be using vim to work on our programs.
vim for UNIX-based OS
vim (or sometimes called vi) is a popular editor that’s also available on just about every UNIX machine (including the ones that you’re using in the CS labs) and UNIX-based machines (like MacOS computers).
To customize your vim environment for a better coding experience with C/C++, let’s add the following lines to a .vimrc file in your home folder (make sure to use this exact filename, since it is a system file, there are no spaces in ~/.vimrc).
Let’s dive in! Open the file:
$ vim ~/.vimrc
Look at the bottom of the vim window to check if you are in the “Insert” mode (if you are not, then type i). Either copy/paste (by right-clicking using the mouse, if you are using the terminals in the lab) or type the following four lines into the file:
set nu
syntax on
set autoindent
set cindent
Exit the “Insert” mode by pressing Esc key on the keyboard, then type :wq to write and quit the file (the colon : is important! Don’t leave it out!).
Again, to learn how to use vim, there is no substitute for practice!!! Here are some more vim hints to refer to. We don’t expect you to be experts in vim this quarter, but you should definitely pick up “survival” skills. A little later this quarter, we will confirm that you know how to do the “basic eight” (vim: basic eight).
There are multiple online resources that you can look at and here are some of them:
Step 5: Create and edit a file containing a C++ program
This assignment only needs you to write a program that prints out two lines on the display, and nothing else. The output should look EXACTLY as follows (no space before or after each line, except the 2 newlines):
Hello, world!
I am ready for CS16!
Start with a “skeleton program” (or template) that contains the necessary structure but that does not do anything:
#include <iostream>

using namespace std;

int main() {
    // Your printing code should go here

    return 0;
}
Go ahead and type this in to the new file called hello.cpp (you will need to do vim hello.cpp). Alternatively, you can copy and paste it directly from this page.
Important note: For students familiar with Python, remember that lines starting with the # character are not comments in C++. Rather, they are important include lines that allow your program to use the input and output functionality. Make sure to copy those lines in your program as well. Only // or /* create comments in C++.
Next, you will need to replace the comment with code to print out the expected output. Comments in C++ are lines that start with // or text between /* and */. The latter style of comment allows text to span multiple lines.
To print out text to the terminal, you can use the cout stream. To output something use the << operator as shown below:
cout << "This will be printed out to the terminal" << endl;
Note: endl ends with a letter “el” (l), not a number “one” (1)!
The endl command will cause a newline (i.e. a carriage return) to be printed and the next print will go on the next line.
You can adapt this line to achieve the objective of the assignment. Remember that we need to print two lines, each with a newline at the end. You can do this with one or two statements.
Step 6: Compile the Code
Now that the code is written, we need to compile it. This will be done using a special program called a compiler.
Before moving on, make sure you save your code and close the text editor. The following step will be done in the terminal.
For C++ code we will use the g++ compiler that’s built into many UNIX machines (it even works on most MacOS terminal programs). You can compile the hello.cpp file into an executable called hello with the following command:
$ g++ -o hello hello.cpp
This will compile your code and make an executable version of it. Specifically, it will tell the compiler to take the source code file hello.cpp and compile and link it to an executable called hello.
If the compilation is successful, you won’t see any output from the compiler, but if you issue a UNIX ls command, you should see a new file has appeared: one called hello. You can then use the following command to run your program:
$ ./hello
Which means “in the current directory, as represented by the . character, run the program hello”. You should then see the program output the two expected lines.
The other possibility is that the program may not compile successfully. What to do then?
If you run the g++ command and are unsuccesful with your compilation, then you might see an output that looks like this:
hello.cpp: In function ‘int main()’:
hello.cpp:10:1: error: expected ‘;’ before ‘}’ token
 	}
The compiler will try to give you hints on the line where the error occurs (in this case, it’s complaining about line 10), and also about what the error is (in this case, a missing semicolon). You will also note that, in this case, if an error occurs, the compiler does not produce (or update) an output executable file.
If you encounter an error, use the compiler hints and examine the line in question. If the compiler messsage is not sufficient to identify the error (which happens more than sometimes), you can search online to see when the error occurs in general (or, if you are stuck, ask any of the teaching staff for help). To fix the error, re-open the hello.cpp file and edit the necessary lines.
Once you have fixed the error, run the compilation command again. Debugging a program code is a necessary ritual in almost all programs written (even those written by expert coders). More on that in a later class.
Step 7: Submitting your code to Gradescope
You will need to turn in your correct hello.cpp file to Gradescope.
The lab assignment “Lab00” should appear in your Gradescope dashboard in CS 16. If you haven’t submitted anything for this assignment yet, Gradescope will prompt you to upload your files.
For this lab, you will need to upload your hello.cpp file. You either can navigate to your file, “drag-and-drop” them into the “Submit Programming Assignment” window, or even use a GitHub repo to submit your work. For now choose either of the first two options and follow the steps to upload hello.cpp to Gradescope.
If you already submitted something on Gradescope, it will take you to their “Autograder Results” page. There is a “Resubmit” button on the bottom right that will allow you to update files for your submission.
For this lab, if everything is correct, you’ll see a successful submission passing all of the autograder tests and receive full credit.
Congratulations on completing your first C++ program!
Step 8: Log Out!
NOTE: If you are in the Phelps lab or in CSIL, make sure to log out of the machine before you leave. Also, make sure to close all open programs before you log out. Some programs will not work next time if they are not closed. Remember to save all your open files before you close your text editor.
If you are logged in remotely, you can log out using the exit command in UNIX:
$ exit