lab03 : ASCII Art: Logical operators
| num | ready? | description | assigned | due |
|---|---|---|---|---|
| lab03 | true | ASCII Art: Logical operators | Thu 10/13 01:00PM | Thu 10/20 02:00PM |
Collaboration policy
- This lab must be completed individually
Academic Honesty
-
All work submitted for this lab should be your own. Do not use code posted on the internet. If you are using any hints from a previous offering of this course that was posted publicly by a CS16 instructor, you must cite your source.
-
You must use the starter code provided for the lab on the release date 2022-10-13. Do not use ANY code from previous offerings of this code. Similarity with old versions of this assignment, including can be used as the basis for academic dishonesty.
Goals for this lab
In this lab you will get practice with:
- for loops and while loops
- nested loops
- functions
- integrating github into your workflow
Step 0: Log on to COE/CSIL/ECI account, cd into cs16
Log into your CoE account on CSIL, open a terminal, and use cd to move into the cs16 directory you created in a previous lab.
Step 1: Find your lab03 repo on GitHub
You should have an empty repo on GitHub under the name lab03-YOUR-GITHUB-ID.
Following the steps outlined in a previous lab, please use the SSH address to clone this repo, i.e.
git clone git@github.com:ucsb-cs16-f22/lab03-YOUR-GITHUB-ID.git
After that, you should have a directory under cs16 called lab03-YOUR-GITHUB-ID. Use the cd command to move into this directory:
cd lab03-YOUR-GITHUB-ID
You may want to practice moving between this directory and the parent directory a few times, and using the ls and pwd commands to understand
what is happening:
cd ..
pwd
ls
cd lab03-YOUR-GITHUB-ID
pwd
ls
Then, as a reminder, while in your ~/cs16/lab03-YOUR-GITHUB-ID directory (remember that ~ stands for your home directory), use ls -a to see that while the directory
may appear empty, there is a hidden folder called .git that marks this folder as a git repository (or repo for short):
$ ls -a
.  ..  .git
$
Step 2: Create the main branch in your repo
Every git repo can have multiple branches of code; this is useful on projects where there are multiple programmers collaborating on a solution. Multiple branches allow for different versions of the code to live side-by-side in a repository, and then be merged together at a later stage.
- Courses that involve group work (such as CMPSC 148 and/or CMPSC 156) may cover the use of git with multiple branches.
- However, in this course, to keep things simple, we’ll typically stick to just one branch
This single branch is sometimes called the default branch.
- Prior to October 1, 2020, the usual name for that branch was
master. - Starting October 1, 2020, GitHub started calling the default branch
main
Not all git software is updated with this convention however. Accordingly, when we clone a new repo, to align our local repo with GitHub,
our first step is to set the current branch to main, with this command (please type this now in your ~/cs16/lab03-YOUR-GITHUB-ID directory:)
git checkout -b main
The git checkout command is the one that is used to switch from one branch to another, and the -b command says that we are creating a new
branch in our local repo.
For the time being, and probably throughout CS16, this is likely everything you need to know about branches (at least for the purposes of this course.)
Now we are ready to pull in some starter code.
Step 3: Add a remote for starter code.
While in your ~/cs16/lab03-YOUR-GITHUB-ID directory, type this command:
git remote -v
The -v here stands for verbose, and it means that the command will give lots of helpful information. The output should look like this:
$ git remote -v
origin	git@github.com:ucsb-cs16-f22/lab03-YOUR-GITHUB-ID.git (fetch)
origin	git@github.com:ucsb-cs16-f22/lab03-YOUR-GITHUB-ID.git (push)
$
Explanation:
- The word remote refers here to a Git repo that lives on some other computer; in this case, a GitHub.com server.
- The output above shows that you have one remote called
originand it shows the URL associated with that nameorigin. - By convention, the name
originis used for the GitHub repo from which you cloned the current repo, i.e. the one that came aftergit clonein a previous step.
What we are doing to do next is add a second remote, called starter. From this remote, you’ll be able to pull in some starter code; your lab solution will involve
working with some of that starter code.
The starter code lives in this repo, which you can visit in a web browser to look at the starter code:
To add a remote for this repo, we’ll use the ssh url, like this:
git remote add starter git@github.com:ucsb-cs16-f22/STARTER-lab03.git
To see if it worked, you can type the git remote -v command again. Output should look like this (with YOUR-GITHUB-ID replaced by your github id.
$ git remote -v
origin	git@github.com:ucsb-cs16-f22/lab03-YOUR-GITHUB-ID.git (fetch)
origin	git@github.com:ucsb-cs16-f22/lab03-YOUR-GITHUB-ID.git (push)
starter	git@github.com:ucsb-cs16-f22/STARTER-lab03.git (fetch)
starter	git@github.com:ucsb-cs16-f22/STARTER-lab03.git (push)
$
Note that if the URLs are wrong for either the origin or the starter remotes, you can fix that by doing this command to remove a remote:
git remote remove originto remove the remoteorigingit remote remove starterto remove the remotestarter
Then you can add the remote back with the correct URL, e.g.:
git remote add origin git@github.com:ucsb-cs16-f22/lab03-YOUR-GITHUB-ID.gitgit remote add starter git@github.com:ucsb-cs16-f22/STARTER-lab03.git
This can be used, for example, if you accidently cloned the repo using the https url instead of the one that starts with git@github.com (which is the SSH based URL).
Assuming your remote for starter is now set up correctly, the next step is to pull in the starter code.
Step 4: Pull in Starter Code
To pull in the starter code, use:
git pull starter main
Then use an ls command, and you should see new files in your directory. That should look something like this:
$ ls
$ git pull starter main
remote: Enumerating objects: 10, done.
remote: Counting objects: 100% (10/10), done.
remote: Compressing objects: 100% (7/7), done.
remote: Total 10 (delta 2), reused 7 (delta 2), pack-reused 0
Unpacking objects: 100% (10/10), 2.45 KiB | 47.00 KiB/s, done.
From github.com:https://github.com/ucsb-cs16/f22/STARTER-lab03
 * branch            main       -> FETCH_HEAD
 * [new branch]      main       -> starter/main
$ls
README.md  starC.cpp  starL.cpp  starT.cpp  starX.cpp
Step 5: Push the initial code to the main branch of the origin remote
To push the code to the main branch of your original remote (origin) type the command
$ git push origin main
This will sync up the commit history and files from your local repo with the main branch of the origin remote (which exists on github.com)
You should see the following message:
Enumerating objects: 10, done.
Counting objects: 100% (10/10), done.
Delta compression using up to 8 threads
Compressing objects: 100% (9/9), done.
Writing objects: 100% (10/10), 3.90 KiB | 1.95 MiB/s, done.
Total 10 (delta 2), reused 0 (delta 0), pack-reused 0
remote: Resolving deltas: 100% (2/2), done.
To github.com:ucsb-cs16-f22/llab03-YOUR-GITHUB-ID.git
 * [new branch]      main -> main
[dimirza@csilvm-11 lab03_test]$ git status
On branch main
Your branch is up to date with 'origin/main'.

nothing to commit, working tree clean
With these files in place, you are ready to start coding.
If you don’t see those files, go back through the instructions and make sure you didn’t miss a step. From here on after you complete each part of the assignment you should add, commit and push your changes to origin main. For instructions on how to do this, scroll down and read the section on “Commit your code to GitHub”
Solving the problems for this lab: ASCII Art
There was a time when laser printers either hadn’t been invented yet, or were not yet widely available. Thus, the only kind of printer most folks had access to was something called a "line printer", which printed only from left to right, top to bottom, and could only print the kinds of characters you find on a typewriter keyboard.
So, you might find folks making pictures like this one, found at http://chris.com/ascii/
                                 .ze$$e.
              .ed$$$eee..      .$$$$$$$P""
           z$$$$$$$$$$$$$$$$$ee$$$$$$"
        .d$$$$$$$$$$$$$$$$$$$$$$$$$"
      .$$$$$$$$$$$$$$$$$$$$$$$$$$$$$$e..
    .$$****""""***$$$$$$$$$$$$$$$$$$$$$$$$$$$be.
                     ""**$$$$$$$$$$$$$$$$$$$$$$$L
                       z$$$$$$$$$$$$$$$$$$$$$$$$$
                     .$$$$$$$$P**$$$$$$$$$$$$$$$$
                    d$$$$$$$"              4$$$$$
                  z$$$$$$$$$                $$$P"
                 d$$$$$$$$$F                $P"
                 $$$$$$$$$$F
                  *$$$$$$$$"
                    "***""  Gilo94'
For now, we’ll be keeping things much simpler: we are going to do some very simple ASCII art of letters, numbers and symbols, in order to practice with if/else and for loops.
The first few exercises will be very simple, but they get progressively more challenging.
An example for you to follow: starL
As an example, we will write a C++ function that returns a C++ string that when printed to cout, makes the shape of prints the letter L with stars, at any width or height, provided both width and height are >= 2
If either the parameter width or height is less than 2, the function returns an empty string.
The function will have the following function prototype:
string starL(int width, int height);
-
As a reminder, a function prototype is the first line of the function definition (the header) followed by a semicolon instead of the function body—it is used to introduce the function to the compiler, in case the function definition isn’t coming until later.
-
You can read more about function prototypes here: C++: function prototypes
The following table shows various calls to this function, along with what the string returned looks like when printed using cout << starL(w,h);
The rule is that the L should have width at least 2, and height at least 2, otherwise the result is an empty string, and printing an empty string results in no output.
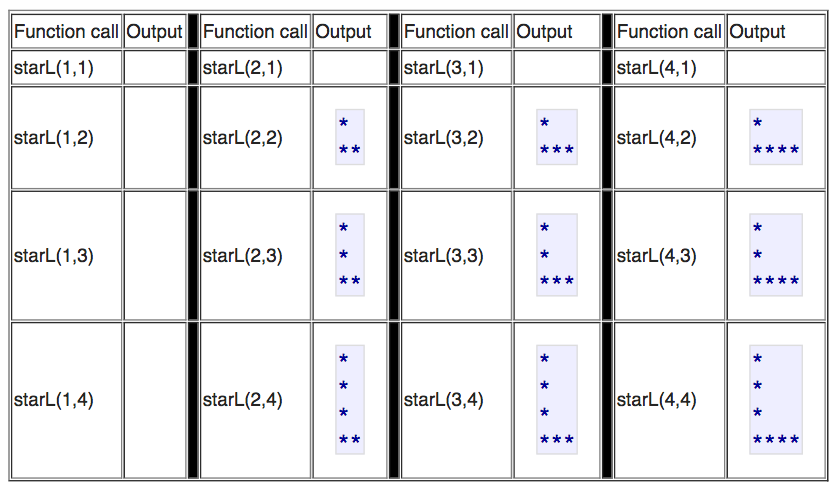
So, this is a fairly easy function to write. This will do the job, and is provided for you as an example of how functions like this should be written.
To test whether this function works, we can write a simple main that takes the command line arguments, converts them to integers with stoi, and then passes those to the function.
What you’ll be doing
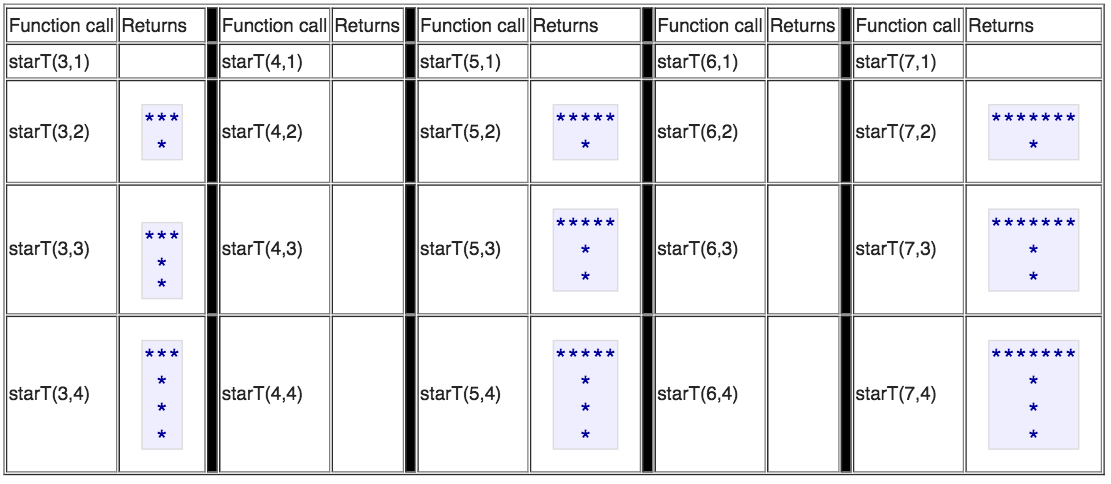
What you’ll be doing in this lab is writing three similar functions: startT, starC and starX
Sample values returned from starT
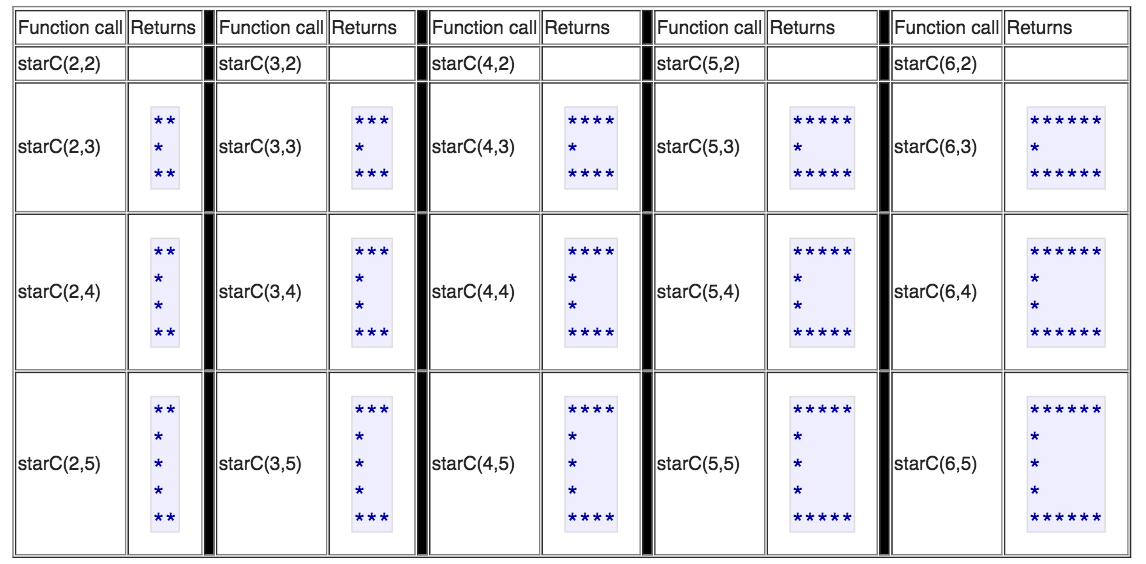
Sample values returned from starC
starC renders the letters C, but requires a minimum width of 2, and a minimum height of 3. Otherwise it returns an empty string.
Sample values returned from starX
starX renders the letters X, but requires a minimum width of 3. It only takes one parameter, because the height and width are always assumed to be equal.
Function call: starX(3)
Returns:
* *
 *
* *
Function call: starX(5)
Returns:
*   *
 * *
  *
 * *
*   *
Function call: starX(7)
Returns:
*     *
 *   *
  * *
   *
  * *
 *   *
*     *
Function call: starX(4)
Returns:
Step by Step Instructions
Step 1: Practicing with the starL program
First compile the starL.cpp file by either typing the command:
g++ starL.cpp -o starL
OR
make starL
Run the program with a few command line parameters. You’ll notice something special happens when you pass in the command line parameters -1 -1.
 ./starL 3 4
 ./starL 4 3
 ./starL
 ./starL 2 1
 ./starL -1 -1
With the command line parameters -1 -1, the program runs a set of tests on itself to make sure that the function starL inside the program is functioning correctly. So, you should be able to get some feedback on whether your code is correct before you even send it to gradescope. The code uses stoi to convert the argv[1] and argv[2] to integer values, and compare against -1.
Look over the code and try to understand how it works. When you feel ready, move on to the next step, and try tackling the starT.cpp, starC.cpp and starX.cpp programs.
Step 2: Writing the starT program
Your job now is to start edit the starT.cpp program, which has a function inside of it that is a “stub”. That function does NOT produce the correct output—it always just returns the string “stub”. You need to replace that code with a proper implementation of starT. You can use the implementation of starL in the starL.cpp file as a model.
Compile your starT.cpp to the execuatable star. Suppose we want your program to draw a T with width 3 and height 2, we will run your starT executable as follows:
$./starT 3 2
In general the parameters to the startT program are width, followed by height. You should take this into consideration when writing your main function. To write the starT() function refer back to the description of starT earlier in this lab. You can also run the program with arguments of -1 -1 to run the internal tests and see whether your implementation is correct.
When you think you have a correct implementation, try submitting to the gradescope system. You can submit just your starT.cpp program to see how far along you’ve gotten.
Note that this will show failures for starC.cpp and starX.cpp, which are files that you’ll be working on at a later step.
You could also just submit the “stubs” for those—though those will fail some or all of the tests.
Either way, for now, concentrate only on the test failures that pertain to starT.cpp and try to address any problems you encounter. If you fix these NOW before moving on to starC.cpp and/or starX.cpp, you will likely have better success, because what you learn from fixing your mistakes will help you get those other parts solved more quickly and easily.
Some rules to keep in mind for the starT function:
- EVERY line of your T should have exactly the same number of characters, and should end in a newline—remember to pad out each line with spaces.
- Return a string that represents the letter T with the correct width and height, but only if height >=2, and width is an odd number >=3
- if the height and width values are not valid, return an empty string
Hints: recall that:
- the
%operator can be used to test where a number is odd or even - the
&&operator means “and” - the
||operator means “or” - the opposite of >= is <, not <=
Also, for starT.cpp:
- If there are not exactly two command line args after the program name (one for width and one for height), print a usage message to stderr (not stdout):
Usage: ./starT width height
- If the height and width are both -1, then invoke the internal tests. Don’t change those. If you do, then you may lose points.
Step 3: Writing the starC program
Next, write the starC program. Follow the same basic procedure as for the starT.cpp program.
To get started, look at the table near the top of this lab that shows correct output for the starC program, as well as looking at the test cases in the runTests() function of the starC.cpp file in your directory.
Note that you’ll need to add some code to the main, but this time the rules are different. The minimum width is 2, and the minimum height is 3—everything else returns a null string (except for the values -1 for width and -1 for height—when passed in combination, the tests should be run.)
When:
- You can run your code with:
./starC -1 -1and all the tests pass - You can run your code on values such as
./starC 4 5and./starC 5 4and see the same output as what is shown in the table, AND - When typing in a command line that doesn’t have exactly two arguments after
./starCproduces the correct error message
then, you are ready to try testing your code on gradescope.
Note that failures for starX.cpp may still show up, but we need not be concerned about those yet.
Concentrate only on the test failures that pertain to starC.cpp and starT.cpp and try to address any problems you encounter. Once all of those pass, move on to the starX.cpp program.
Step 4: Writing the starX program
For the starX.cpp program, we have these rules:
- Take only one command line parameter: the width. The height will automatically be set equal to the width.
The starX function follows these rules:
- return a string that draws the letter X with the correct width and height, but only if width >=3 and odd
- return an empty string if the value passed in for width is not valid, print nothing at all.
As with starC.cpp, you should add code to starX.cpp so that you are able to invoke the internal tests by typing ./starX -1 . Note that this time, there is only one parameter.
And, if there is not exactly one parameter, there should be an appropriate “usage” message that follows the pattern of the other programs—except that there is only a width parameter in this program.
When you have a version that can pass its internal tests, try submitting it along with your starT.cpp and starC.cpp to gradescope.
If there are errors reported, fix them.
When you have a clean build, you are nearly done with this lab. I say “nearly” done, because you should take one last look over the grading rubric to see if there is anything you need to adjust before doing your final submit and calling it a day.
Note: You MUST make one final submission that includes ALL of your files. For getting incremental feedback while working on the lab, it is fine to submit one at a time, but for GRADING purposes, your LAST submission (in time) must be a complete submission of EVERYTHING. In the ideal case (for you), that submission is completely “green”, i.e. all test cases pass, and you have a perfect score (at least from the standpoint of the points you are awarded for passing the test cases.)
If there are parts you can’t figure out, be sure to submit all of your files anyway to maximize the number of points you receive based on the parts that ‘'’are’’’ working.
Commit your code to GitHub
When each of your programs is done, you can commit your code to GitHub.
You can wait until all three are finished, but you are encouraged, instead, to do this one by one as each program is complete.
For example, to commit the program starT.cpp to GitHub, use these steps:
| Step | Command to type | What is happening |
|---|---|---|
| 1. | git add starT.cpp. |
This adds the file starT.cpp to something known as the staging area. This prepares the file to be added to our git repo. |
| 2. | git status |
This command shows us the current status of our repo. We should see that the file starT.cpp appears in green, as a file “to be committed”. |
| 3. | git commit -m "add starT.cpp to repo" |
This commits the files in the staging area to the local repo on CSIL. The -m stands for message, and the part in the quotes is the message. Every commit has a message to our future selves and to other programmers about what we were doing when we made this commit. Learning how to write good commit messages is an important skill. |
| 4. | git push origin main |
This pushes the changes from our local repo on CSIL to the original repo that we cloned (i.e. origin on github.com |
You can repeat the steps above for the files starC.cpp and starX.cpp as/when you have them ready.
Note that if you subsequently make changes to any of the files starT.cpp, starC.cpp or starX.cpp, the process to update GitHub is the same—that is, you still use git add filename.cpp when you want git to pick up changes to files that are already in the repo.
At any time, you can type the git status command and it will help you determine which files, if any, are out of date in your repo. For each out of date file, the sequence git add filename.cpp, then git commit -m "message goes here" then git push origin main should get the changes published to your GitHub repo.
You can visit your repo at any time by logging in to GitHub, and visiting <>, where you should see it in the list of repos to which you have access. If you don’t see it there, ask the staff for assistance.
Submit your code on gradescope
Once you are satisfied that your program is correct, then it’s time to submit it.
Log into your account on https://www.gradescope.com/ and navigate to our course site: CMPSC 16. Select this assignment.
Then click on the “Submit” button on the bottom right corner to make a submission. You will be given the option of uploading files from GitHub.
You should receive 90/90 for a set of completely correct programs, and partial credit if one or two of the three is correct.
If any errors are shown, you can address that with this sequence of steps:
- Go back to edit the file with
vim filename.cppand make the needed changes - Recompile with
make filename - Test interactively by running
./filename - Use this sequence of steps to update GitHub:
git add filename.cppgit commit -m "message goes here explaining what you did"git push origin main
- Resubmit on Gradescope from your GitHub repo.
Step 8: Done!
If you are logged in remotely, you can log out using the exit command:
$ exit